Wednesday, July 29, 2009

Ducks


We wanted ducks because we have ponds. "Ducks would look nice on those ponds," we thought.

We bought three mallards locally and ordered ten Indian Runner ducks.

If you remember the duck from the movie "Babe", that was a Runner duck. Supposedly they stand upright from generations of being herded.

I thought they would look just like the pictures in catalogs, but I guess that is the idealized version. They don't stand like that all the time either - just when they are very alert or when they are running.

They are hilarious when they are young. If Indian Runner ducklings were prescribed for people who are depressed, it would save a lot of money spent on drugs. We shared a lot of laughs over these ducks last spring.


Typical duck posture


Two of the mallards were victims of us not realizing what a coyote problem we had. After a certain age we were letting them sleep wherever they wanted, when we should have been locking them up at night. We learned that the hard way.

The morning of our realization about the coyotes, the remaining mallard was so pitiful. She wandered everywhere looking for her buddies. I felt really bad and really stupid.

She got used to the Runner ducklings after a short time though. They annoyed her, but she wanted some friends.

One of the Runners was DOA, and two disappeared in mysterious incidents. We suspected the dog, especially after we spotted her with duck feathers in her mouth. She was still a puppy and may not have realized what she was doing.

So now we have a group of eight ducks, none of whom want to go anywhere near the ponds. They want to stay in the yard. They like looking at their reflections in the glass shop door. They don't want to have anything to do with us, yet can't bear to be too far away from us. They love their kiddy pool and hate the ponds.


Ducks don't like being much farther apart than this.

But lately we've had glimmers of hope. The ducks have discovered that they like the ditch, and have been spending a lot of time there. Ducks are the messiest creatures on the earth, and being messy in the ditch is infinitely better than being messy on the porch.

We have been trying to coax them over to the ponds by putting corn out in the area. Someone told me that it took their ducks about a year to want to live at their pond, so there is still hope!

Monday, July 27, 2009

Conditions


"Ratings can be all over the map on this one, WI 5R, M5, 3 to 5 pitches can be had, or it can be WI6-R and no M rating or if you are lucky casual WI4 and no rock. It is a water ice climb in an alpine environment so it is all about conditions. Today they were good."


A few years ago a buddy of mine was telling me how his ridiculously hard first ascent of a mixed alpine line, had now been down graded, without ever have been repeated. Part of it he blamed on the French. Part of the discussion, and his real point, I failed to fully understand at the time.

The French climbers who had recently repeated the route, did so in conditions the first ascent party only dreamed of. The Anglo/Saxon team had hard mixed, dry tooling, little pro and less ice. The French had neve' inches thick and yards wide, a tiny bit of mixed in comparison and climbed the majority of the same line as a pure ice climb with single swing, bomber sticks.

The two teams on the same stellar line obviously did not have the "same" experience.


So my friend was right. "His" climb has yet to be repeated. But that has always been the nature of alpine climbing and even more so with the most modern alpine mixed routes.

Before modern ice gear, the greatest alpine ice routes were generally only climbed when they were perfect snow or neve'. Anything that showed bare ice was considered too dry and out of condition. Now we search out those dry "real ice" conditions and quickly front point through easy alpine neve'.

Ice runnels that offer stellar M climbs are there and climbable one day and gone the next in the Cascades or Alps. Good example was a line I climbed last winter following a party from the previous day. Then two days later that runnel was bare rock and the ice gone. Subsequent parties that winter by passed the crux (because it simply was no longer there) of "our" route by climbing easy snow well right of our original line. Discussion of the route between a dozen of us who had been there left us wondering just what "climb" we were actually on?! M5 or easy snow? You wouldn't think that would be much a discussion. But it took pictures taken during "our" climbs actually showing "our" conditions to sort it all out.

What have learned from all this? Climb when you can, enjoy what the conditions are while you are there and then forget about it :-)


The two pictures are the same climb almost exactly a year to date ('09/'10) separated in time. The pitch you are looking up in both pictures is a over-hanging rock corner, and typically fills in with ice formed from melt water coming down from high on the peak. Enough ice generally to climb as a WI5 to WI6- with an R rating. How over-hanging the climbing is depends on how much ice has formed. It can build enough ice to be a WI4- route. The initial quote at the beginning of this blog and the photos are from the classic Cascade ice route on Snoqualmie Pass, "Flow Reversal".


My peference for any WI6R route? Wait till it is FAT!
Late spring WI4 condition.

And another photo of the same line a few years previous. Roger Strong photo

Sunday, July 26, 2009

Liberty Ridge - Spring Ascent

A team of 3 Midwest climbers set their sites on Liberty Ridge last week... and for the second reported time in 2006, climbers made it again to the summit of Rainier. Erik Beeler, Neal Mueller and Isaac Will pushed through deep snow, high winds, whiteouts, steep ice, 5th class rock and even a moonlit night so that they could top out of Mount Rainier's classic of line.

The wintry conditions took more out of the team than expected. In particular, areas of really deep snow became troubling and time consuming. They had intended to spend three nights on route, but needed FIVE and were forced to bivy near 13,000 feet.

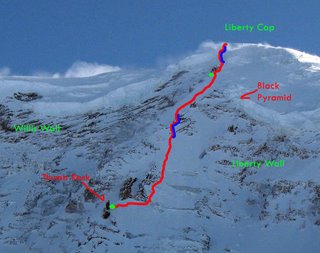
In this close up image of the upper route, green dots represent the high camps and bivies and the blue sections represent areas of difficulty or belays. It's interesting to note that the team took the far right variation out of Thumb Rock.

Neal made it clear that "some deep snow" was not going to thwart their summit efforts. A mix of Midwest pride and fortitude pushed the men through the exhausting conditions. And yes, they did wonder about avalanches...

They started late the 1st day and spent the night along the trail in the snow. The 2nd night found them near the access to the Carbon, 7,200 feet. It was up to Thumb Rock for the 3rd and 4th night. Isaac stated that the extra night was needed because,
"As soon as we started to set up camp, my body started to let me know exactly what I had done to it... I threw up before I got in the tent, and... three more times before I could get some Power Gels and water to stay down. I didn't have a headache and I was not concerned it was AMS. The weather was not perfect and when we woke up at 0500. I said I could use another day to recover. They all agreed a rest day was in order so we stayed in the tent all day long."
After a recovery, the team climbed a major porition of the upper route. The 5th night was pitched at a bivy site above 13,000 feet. At that camp, Issac described setting anchors into the rock for fear of either being blown or avalanched off the mountain. Thankfully, neither happened.

They belayed two pitches of alpine ice (one was described as 15 fee of WI 4) to reach Liberty Cap. After finding a few crevasses the hard way between Liberty Cap and the summit, the team cautiously descended to Camp Schurman. They spent a final night in the hut, but only after digging it out. Somehow, the door had blown open during the winter and for the most part, the hut was filed with snow...

The team intends to post a trip report on summitpost and cascadeclimbers. You can also find information on Neal Mueller's website.

Successfully climbing Liberty Ridge is quite an achievement this time of year, congratulations and thanks for your help digging out the Camp Schurman hut! Also, thanks to Pandora for sharing her image here.

Saturday, July 25, 2009

Nisqually Icecliff

The weather was pretty much perfect on the upper mountain last Thrusday, Friday, Saturday and Sunday. Clear, cold, and calm. As the attached images will show, the Nisqually Basin routes (Icefall, Cleaver, Icecliff and Chute) all looked pretty good.

Nisqually Icecliff, on Saturday a solo climber successfully climbed the route. This marked the first summit for Mount Rainier in 2006, and a rather significant achievement for the climber, Hannah Carrigan.

Carrigan, headed out towards the Nisqually Basin around dawn, considering both the Icecliff or the Cleaver route. The Cleaver was tempting, but looked thin and icy (particularly near the high traverse up on the Cleaver itself.) The Icecliff also looked hard and thin in places, but doable considering the winter snowload. In the end, she opted for the Icecliff.

Carrigan reported firm snow and ice for much of the route. There were a number of difficult problems to negotiate. One section of the icecliff required commitment to both ice tools while traversing and climbing. Getting across the Bergshrund at the base of the cliff also required technical climbing. One notable comment was that slots, crevasses, and steep sections viewed from below, grew substantially in size once on scene.

After passing the technical secions in the Icecliff, Carrigan then ascended the upper Nisqually Glaciers to the crater rim and Columbia Crest. She reported a number of open crevasses on the upper Nisqually and Ingraham glaciers. Despite the deep snowpack below 10K, there still seems to be some gapping crevasses up high.

Carrigan descended the Gibraltar Ledges back to Camp Muir. An excellent solo journey on a big mountain in the winter, Good Job Hannah!

Gibraltar Ledges, a few climbers have reported STELLAR conditions on this classic Rainier winter route. They stated that the route has more snow and ice than normal. The traverse along the ledge, and chute were particular hard and icy. This makes for excellent climbing, but also increases the difficulty. Climbers should bring pickets AND a few ice screws.

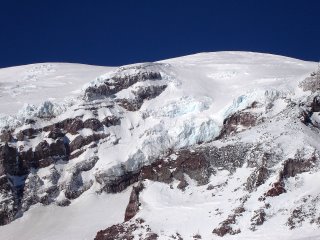
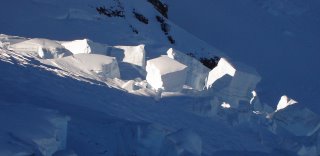
Ingraham Direct, there is some ice going through Cathedral Gap, but nothing too daunting. Once past the Flats, climbers have been ascending the right side of the glacier up to the top the Disappointment Cleaver. Though no teams have summited this route, it looks as though the route does go.

Friday, July 24, 2009

They're Gone!

This morning when we got to The Family History Library all of the pretty flowers had been removed. My guess is they will be planting something soon, but it was such a shock to see nothing but brown dirt in the flower beds. They were so colorful...


Wednesday, July 22, 2009

Paint Brush?

This is a close up of the Indian Paint Brush wildflower. I still can't figure out why it is called a paint brush. Sure doesn't look like one to me.

Saturday, July 18, 2009

Man Fashion Friday

Model wears:

3/4 Pant - models own design 100% nylon, gusseted climbing pant,tailored in Shenzhen, China for jjobrienclimbing.

Shirt - models own design,100% silk, with gold thread brocade, reclaimed Idian Sari fabric. Tailored in Shenzhen for jjobrienclimbing.

Glasses - Shanghai Tang HK

Croc knock offs - HK street market

Location Coolum Cave.


OMG is that international Aussie rock star Lee Cujes?Model looks hot in:


Jeans: by G Star Raw


Inner Jacket: in lime by Boulders and Nuts(models' exclusive clothing sponsor)


Faux leather bomber:unpurchased I suspect,

by the dead stock and sample cult mega-label"Mee and Gee" of Hong Kong


Glasses: unknown


Location: Mee and Gee, Tung Choi Do HK(upstair for man)


Photo: Sam Cujes, on Lee's iPhone presumably

Welcome home to Australia, Lee and Sam.


Friday, July 17, 2009

Paul Carson Step-Through Bicycle

Paul Carson Step-Through

As I stood composing this shot, a woman passing by with grocery bags stopped beside me. Looking at the bicycle, she tilted her head to the side and smiled. "That bike!" she said, "It looks like... happiness." It was a funny outburst, no doubt inspired more by the sunny day and the quaint tree-lined street, than by the bicycle itself. But I knew what she meant. Because this particular bike fit into the idyllic backdrop perfectly. Simple, friendly and inviting, it looked like no more and no less than what it was - a yellow bicycle on a beautiful summer morning. Maybe Paul is onto something here, I thought.


Paul Carson, Artisan's Asylum

Even though Paul Carson makes bikes and teaches others how to, I do not really think of him as a framebuilder. He is more of an engineer, an experimenter, a problem-solver. Paul doesn't see what he does as a craft, but as production that he loves to simplify and optimise. You might not find him polishing frame joints for hours on end. But you will find him making ridable prototypes with speed and ingenuity ...as well as the tools, fixtures and parts to facilitate doing so. In a sense, Paul is like a magic genie who can turn wishful thinking into reality, and fast. On one occasion, I watched him make a rear rack in under 20 minutes, so that he could try out a pannier on his roadbike. Another time, I wondered how difficult it would be to make a double-plated fork crown from scratch. He asked me to elaborate. I explained and showed pictures. He thought about it, then ducked into a corner. Hack-hack-hack. File-file-file. Flames! Flames! "Like this?"


Paul Carson Step-Through

And there it was - double-plated fork crown for oval blades, spaced for a wide tire, just as I described. "Glad you like it," he shrugged. "I'll get a batch of these machined." That's Paul Carson, in a nutshell.


Paul Carson Step-Through

Unlike most other local builders, Paul is not part of the racing scene. He isn't even really part of the local bike scene so much; he is just his own entity.Perhaps that is why he gravitates toward making city bikes. City bikes have an immediate and obvious utility. And it is fun to see them cruising around the neighbourhood, ridden by ordinary people, carrying milk and potted plants. Over the past months, we've been discussing some ideas for step-through designs. We both like the feel of old English 3-speeds and we also like low trail. Wouldn't it be great to combine these? While our ideas diverge when it comes to wheel size and exact geometry specs, overall Paul's idea of a great step-through is not dissimilar to mine. When he asked me to tryhis prototype, I was eager to give it a go.


Paul Carson Step-Through

Made of touring grade cro-moly tubing, the Paul Carson Step-Through is designed around 700C wheels with up to 35mm tires and fenders. Ithas a gently curved top tube, and is proportioned so that the handlebars can sit at or just above saddle height. 72° head tube angle and 73° seat tube angle. Trail in the mid-40s.


These framesets will be made to order in a range of sizes and with a menu of options, with prices starting at $650 for a TIG-welded frameset with standard (lugged) fork crown, made for caliper brakes. The price includes powdercoat in a range of standard colours and a headset. Extras include the option of fillet-brazed construction, handmade double-plated fork crown, handmade stem, and cantilever/ v-brake bosses. Turn around is 4 weeks.


Paul Carson Step-Through

Paul designed this frame with versatility of build in mind. Semi-horizontal dropouts make it possible to use either derailleur or hub gearing. The bottom bracket height (300mm with 28mm tires) is sufficient to set up the bike as a fixed gear. Braze-ons include eyelets for racks and fenders.440mm chainstays are long enough to carry panniers without heel strike. And the front-end geometry will handle a front load.


Paul Carson Step-Through

The demo bike I tried was built in size 55cm and with all the extra options. Fillet-brazed joints, smoothly finished, but not fussed over.


Paul Carson Step-Through

Canti-lever bosses and cable hanger.Twin plate fork crown.


Paul Carson Step-Through

And fillet-brazed stem (threadless).


Paul Carson Step-Through

Paul set this bike up with 28mm tires and fenders, a single speed drivetrain,


Paul Carson Step-Through
swept-back handlebars with cork grips,


Paul Carson Step-Through
and a Brooks Flyer saddle.


Paul Carson Step-Through

Leaving my own bike at the Asylum, I rode the Step-Through around town in the course of the morning, simulating some of my regular routes. When I struggle for something to say about a bike's handling, that generally strikes me as a good thing - as it means nothing is "wrong" with it. Paul's bike felt familiar, natural, normal. It also felt casual and accessible, more like a cool, repainted vintage bike than a new handmade bike. And it really did look oddly at home in our neighbourhood.


The fit worked well for me, with a more aggressive posture than a fully upright bike. There was no toe overlap with the size 55cm frame and 28mm tires with fenders, though it was close. The steering felt responsive and intuitive. My own city bikes are low trail (under 30mm) and this bike handled like a more neutral version of them.


Paul Carson Step-Through

As far as nit-picks, the step-over height could be a bit lower for my taste. And in my view, a practical city bike (especially for a pothole-ridden neighbourhood like ours) would ideally be specced with 35mm wide tires minimum, not maximum. This is where a smaller wheel size might be worth considering, especially if toe clearance is a priority. Personally, I also prefer lower bottom brackets. But I know that some riders like to feel as if they are "sitting high in traffic" on their bike, which the higher bottom bracket accomplishes.Otherwise, not much else to criticise;I liked the bike.


Paul Carson Step-Through

Paul Carson is an exciting person to know. He has ideas about streamlining the framebuilding process to make handmade bikes more accessible, andI will be following his work with interest. Made in this vein, the Carson Step-Through is not meant to be an artisanal show-stopper. It is a cute, friendly, ridable bike, with a friendly price, handmade in Somerville MA.

Wednesday, July 15, 2009

Adventures with Twine

The most typical use of twine on a bicycle, is to secure the inner edges of handlebar tape. Normally, bar tape is secured with black electrical tape and left as is, but I find that this looks unfinished. With twine, the handlebars will look more appealing and the tape will be more securely attached.

I use cooking twine, which is softer to the touch than industrial twine. It is white in its untreated state and turns caramel-brown when amber shellac is applied.

After wrapping your bar tape and securing the inner edges with electrical tape, the twining can begin.

First apply a layer of clear double-sided tape over the electrical tape.

Cut a half-armlength of twine.

Apply the twine over the double-sided tape by simply wrapping it around the handlebar and placing it down neatly onto the sticky surface of the tape. There should be no gaps and no overlap.

When the surface of the double-sided tape is covered with twine, cut the remainder off. There is no need to secure the twine, since it is stuck to the double-sided tape. This will provide a good temporary hold until shellac is applied.

Using a paintbrush or a sponge brush, cover the twined area with amber shellac following the same principles described here.

After three layers of shellac, the twine should feel completely solid and have a deep amber colour to it, at which point the project is finished. Your bar tape will be more secure than ever and will look great.

If you've finished twining your bars and still crave more, do not despair: There are lots of other places on a bicycle where twine can be used. I twined the chrome connector piece between the rack and the rear stays on my Pashley, because I was not satisfied with how the expanse of chrome stood out in an otherwise green and black colour-scheme. The dark amber twine softened that area up, and integrated it nicely with the wicker basket, brown leather saddle, and handlebar grips.

Here is a close-up of the twined rack connector. I thought that this was a failry subtle detail, but to my surprise, several people commented on it while examining my bicycle.

My most daring use of twine thus far, has been the twining of my Shimano Nexus shifter. My reasons for doing this were two-fold: I thought that the big rubber shifter was too modern for the aesthetic of the Pashley's handlebars, and I also found it unpleasant to the touch, especially in the sumemr heat. Covered with shellacked twine, the shifter blends in better and is more comfortable for me to use, as the twine provides a better grip than the rubber. There was some concern regarding whether the twine would adhere well to the rubber, but this was not an issue; just wrap it tightly prior to shellacking.

Of course, once you do this to your shifter, there is no going back: the shellac will disfigure the rubber if you ever decide to remove the twine and you will need to buy a new one. Twine at your own risk!

For more twining ideas, Rivendell has some nice pictures and instructions, as well as hemp twine for sale. Also have a look at this marvelous twined water-bottle pictured on The Epicurean Cyclist.

Wednesday, July 8, 2009

The Gift WI4R, First Ascent SWPA

Laura and I made a last minute decision that based on the poor (warm) future SWPA forecast, we needed to climb whatever we could find, before it was gone! We quickly agreed that Sunday School Crag would be our destination since it resides at a higher elevation than most other SWPA crags. It also receives little to no sun. If anything was "in" it would be Sunday School. On New Year's Day Laura and I hiked in to try to climb, but poor conditions kept us off the ice. We took note of a line that was forming just right of the line we did last year Late Bloomer. It looked like a lot of fun, but we figured it was better left for safer conditions. Today was that day, although the conditions weren't much safer. When we left home it was humid and the thermometer was reading 31°. The snow in our yard has compressed considerably leaving us worried for what we'd find at the crag. It wasn't much colder at the parking area, but there was still several feet of snow that required us to snowshoe the approach.


Laura snowshoeing to Sunday School Crag


The approach isn't long, but what it lacks in distance it makes up for in terrain. On most average days its an invigorating 30 min. hump that takes a few trips to truly "appreciate". We made the hump at slower than normal pace trying not to overheat too much despite not wearing much at all. When the climb came into view I was puzzled that the climb hadn't built much more than what we had seen on New Years Day. I could audibly hear lots of running water which didn't instill much confidence, despite this we trekked onward to base camp.


Laura happy to be at "base camp"


With a severe warm-up looming in the next few days, I looked the climb over and quickly decided it was "good enough" to at least get on and test the start. Since last ice season was pretty much a no show, I'veonly climbed a few pitches of pure ice over the last several years. I was seriously hoping I remembered how to ice climb ;) A reasonably solid ice start provided me with a confidence building screw.


Starting up The Gift WI4 through the ice start


The good ice quickly faded as I continued up a snow ramp pulling off eyelids and exposing underlying sloping limestone defunct of edges. I tiptoed my way up to the next bit of "ice" that provided a few insecure screws and eventually an icicle worth slinging accompanied by a small 12" diameter column that seemed more solid than anything thus far. This set me off right across another sloping, snow encrusted ledge which crumbled and exposed more slick limestone for my feet.


The base of the short pillar and best ice on the route


I eventually reached somewhat solid ice a little higher up and the first good screws of the climb. A short 15' pillar ended at more snow covered limestone which provided a very exciting, hollowed ice and rock top-out.


Topping out the pillar


I slogged up through deep snow to the base of the lower angled ice above and found that it was melting out fast and poorly bonded. The true climbing was over and the quickly deteriorating ice above helped me decide that the route was finished at that point. I quickly set up the most secure belay I could muster and prepared to bring Laura up. She progressed up the climb enjoying every move. She found it to be boney and melting out quickly, as did I. We shared a brief moment at the belay and snapped a few photos for memories.


Self portrait of the happy couple at the anchor


I gently lowered Laura down supporting most of her body weight with mine, carefully trying not to involve the anchor if necessary. With Laura safely on the ground I quickly utilized the best ice available and built a V-thread and rapped down without sacrificing anything, but cord.


Laura says... How could you not smile after climbing "The Gift"


The climb was a great season opener and a lot of fun, but the unpleasant sounds of ice falling off the walls around us, we knew we overstayed our welcome. We packed up and snowshoed back to the car. I snapped a few photos of the deteriorating ice for giggles. We decided to name the route The Gift WI4R in current conditions. We decided it was "The Gift" from mother nature, since she didn't offer very favorable ice seasons the last several seasons. Hopefully this isn't all we'll get this season. Stay tuned...


Meltdown... a common sight today


Fractures common as well


Where's Waldo? Center of photo in the right chute