
The alpine ice axe revisited
The thesis of this post is that the classic mountaineering ice axe, or alpine ice axe, has been generally overlooked, with the current movement toward climbing harder and harder ice and mixed routes, and the focus on technical ice tools that such practice demands. I think that there is still an important place for the alpine ice axe in the mountains. Furthermore, I think that careful study of the alpine axe may paradoxically shed light on the design of modern technical tools, and yield new perspectives on climbing.
Who am I?
Dane, the gracious host of this blog, invited me to write a guest post, so I imagine a few words about who I am are in order. Dane always goes to great pains to emphasize that he is a normal climber, just like the rest of us; for example, he dreams about the same routes, visits the same web pages, purchases all of his own equipment, and so on. Of course, we know this is not true. Dane climbs WI 6 with one hand, he dangles upside down by his crampon points, and he leaps mountains in a single bound. I, on the other hand, truly am a normal climber. I teach high school, I live in the middle of a flat city, and I am the father of a young child, more preoccupied with changing diapers and warming bottles than plotting lines up steep faces. My only claim to fame is that for several years I worked as an instructor for the National Outdoor Leadership School (NOLS) leading mountaineering courses in the Rocky Mountains. In this capacity, I spend countless hours carrying absurdly heavy packs, wearing baggy nylon trousers, and covering my boots with high black gaitors, things for which NOLS is famous, I am told. I have lead students on easy glaciers and peak ascents, and I have introduced plenty of people to climbing on rock, snow and ice, but I am definitely not a guide; rather, I consider myself an intermediate climber, always learning, always growing, trying to find my own place in the mountains. Following blogs such as Dane’s make me feel like I am still connected to the mountains, even when my next climbing trip might be months away. I have always had an interest in the technical side of things, hence this post.
What is alpine climbing?
Because I plan to talk about alpine ice axes, perhaps the first relevant question is, “what is alpine climbing?” The best answer to this question I have seen is on Raphael Slawinski’s blog:
http://raphaelslawinski.blogspot.com//12/faux-alpinism.html
My favorite requirement for alpine climbing from Slawinski’s list is slogging, endless marching on moderate terrain, preferably through deep powder. While entertaining, this point is worth emphasizing, something made clear by Mark Houston and Kathy Cosley, in their superb book, Alpine Climbing, Techniques to Take You Higher. Houston and Cosley report that the “typical” alpine climb only requires about 20 percent roped technical climbing, as compared to 80 percent scrambling and hiking. That is the kind of climb I am thinking about when I say, “alpine ice axes.”
This is probably the place for Dane to interject, and post a picture of Steve House, Colin Haley, or some other professional, climbing a mountain with technical ice tools, perhaps followed by the caption, “Is this alpine enough for you?” While these climbs are undeniably alpine, I think the comparison is misleading in several respects. There are important differences between these types of climbers, the routes they undertake, and their equipment choices, including their ice axes, and the rest of us (more on this below). So, for now at least, I will describe an alpine ice axe as a classic mountaineering axe, with a relatively straight shaft, a spike, an adze or possibly a hammer, and a low-angled pick.
What are alpine ice axes good for?
Once, when I was a student on a mountaineering course, I asked our guide, “Are we going to carry ice axes?” To which the guide replied, “Yes, and we will try to use them for more than digging cat holes.” While alpine ice axes are effective tools for burying human waste, they do serve a wide variety of other uses in the mountains.
Probably the most obvious use of an alpine ice axe is simply as an additional balance point when walking over easy ground, like a cane, hence the common term, piolet canne. The importance of using an alpine ice axe this way cannot be overstated, especially when just starting out in the alpine world. In no particular order, alpine ice axes are also useful for self-arrest, building anchors, plunging into soft snow, clearing platforms, staking out tents, chasing marmots, threatening uncooperative climbing partners, and finally, swinging overhead, in the familiar piolet traction position, to gain purchase on steep snow or ice.
Many choices
Enter “ice axe” into an image search engine, and you will be confronted by a bewildering diversity of options. Some of these are strange creatures indeed.
Consider this axe with a telescoping trekking pole in the shaft:
http://www.petzl.com/en/outdoor/glacier-travel-ice-axes/snowscopic
This axe with a plastic grip molded into the head:
http://www.grivel.com/products/ice/ice_axes/60-futura
This axe with an aluminum pick:
http://www.camp-usa.com/products/ice-axes/corsa.asp
Or this axe with a full-length rubber grip:
http://www.petzl.com/en/outdoor/classic-mountaineering-ice-axes/summit
All of these axes, in one way or another, address the purposes described above. Broadly speaking, there are axes geared more toward walking (the piolet canne end of the spectrum) and alpine axes geared more toward climbing (the piolet traction end of the spectrum). And between two extremes, there is a wide continuum of designs, each with different features. It goes without saying that some designs are more successful than others.
For my climbing style, the best alpine ice axe on the market is the Grivel Air Tech Racing, which, despite its “technical” name is in fact a classic design with a few subtle and important innovations.
http://www.grivel.com/products/ice/ice_axes/8-air_tech_racing_sa
I like the Air Tech for many reasons. It has a substantial forged pick which holds a good edge and can be swung solidly into ice. It has a very subtle curve on the shaft which gives it some clearance while still permitting self-arrest. There are no grips on the shaft so plunging is easy. And it is very light.
However, the main reason that I like the Air Tech is related to the design of the shaft and head. The Air Tech shaft extends all the way to the top of the head—the head is slotted into a groove in the shaft and capped with a small piece of plastic. This creates a wide platform for the hand along the top of the head, making the ice axe comfortable to hold and thus secure. Not all axes are built this way.
Consider the Petzl Snowalker:
http://www.petzl.com/en/outdoor/glacier-travel-ice-axes/snowalker
The head of the Snowalker is simply a thin piece of metal resting on top of the shaft. As such, the head cuts into your hand like a blade, and makes proper use of the axe difficult.
Or the Black Diamond Raven:
http://www.blackdiamondequipment.com/en-us/shop/climb/ice-axes-piolets/raven-ice-axe/
The Raven incorporates a flattened surface along the top of the head to provide support for the hand. At first glance, this seems like a good thing. However, below the pick, there are two half-circle indentations, designed for fingers. I find this uncomfortable. My fingers get trapped in the indentations, and I can not move my hand. This difference, between simple designs which allow a variety of hand positions, and more complicated designs which lock the hand in one position, is an important concern that I will discuss in more detail below.
Length
Perhaps the most important characteristic of an alpine ice axe is length. Here, there is an interplay between a climber’s skills and the length of an ice axe. In general, beginners are better served with longer axes, which will function as added balance points on gentle ground, while more experienced climbers will be better served with progressively shorter ice axes, which only become useful on steep terrain. I had this point made abundantly clear to me when teaching a friend basic snow travel. The terrain was nearly flat, but he was using a very short axe, therefore, to progress, he had to bend over in an awkward and contrived position. For his purposes, a longer axe, which allowed him to stand in a more natural and upright position, would have made much more sense.
As climbers develop better skills, they require the assistance of an ice axes less and less. That is why you often see guides climbing with very short ice axes, while their clients are carrying long ice axes. The guides, because of their skill, can move over easy ground safely without using axes, while their clients are still in the stage where they can make good use of long axes.
To a large extent, this also explains why professionals often climb with two technical tools: their skills have progressed to the point where they simply don’t need axes most of the time, and only use the technical tools when they arrive at steep pitches. This does not change the fact that most of use can still benefit from using correctly sized alpine ice axes, which is to say, sized to both our body and our ability.
When I bought my first ice axe at a large retail store, the salesman tried to steer me toward a short axe.
“You’ll just buy a shorter axe later,” he said. Although the salesman was correct—I did eventually buy a shorter axe—I think his advice was misplaced. I made good use of my first, longer axe, and then, as my skills improved, I bought a shorter axe. I now own two Air Tech axes of different lengths, both well-worn, which reflect this progression.
Hand positions
In addition to length, another important design consideration for alpine ice axes is the variety, comfort and support of different hand positions. As you progress from easy to moderate terrain, you naturally use more hand positions, for example, switching from the cane to the self arrest position, holding the ice axe high on the shaft under the head, holding the ice axe by the adze with part of the hand aligned with the side of the pick, and so on. I won’t enter into a discussion of the various advantages and disadvantages of all the hand positions (or the equally contentious debate about which is the best grip to use, the cane position or the self arrest position, which is treated delightfully in Houston and Cosley’s book) but I do think that it is important to choose an axe which supports a wide variety of hand positions, in particular, those which suit your particular climbing style. Thus, if you like to hold an axe by the adze with the pick facing forward, choose an ice axe which supports this position, and so on. I will also say that the best axes, like the Air Tech, accommodate a wide range of hand positions naturally and comfortably, and thus easy to adapt to different terrain and techniques.
There are some ice axes which seem purposefully designed to limit hand positions:
http://www.camp-usa.com/products/ice-axes/x-lite-1421.asp
I can see that holding the X-Lite in the prominent groove built into the head might be comfortable, but it appears that many other hand positions would be impossible.
In contrast, features which make moving between different hand positions easy include simple shaft designs, rounded edges, and smooth contours. If I was asked to improve the Air Tech, one of the few changes I would make would be to round the sharp corners of the adze: I think that softer edges would allow for more fluid changes between hand positions.
Transition tools
Before I move on to technical tools, it’s worth noting that many ice axes can be classified as transition tools, or intermediate tools, which fall somewhere between alpine ice axes and technical tools. Usually, these axes include steeply-dropped picks, curved shafts, and some kind of dedicated grip.
Here are some examples from the big three:
http://www.grivel.com/products/ice/ice_axes/65-jorasses_20
http://www.petzl.com/en/outdoor/verticality/ice-axes/technical-mountaineering-ice-tool/aztarex
http://www.blackdiamondequipment.com/en-us/shop/climb/ice-axes-piolets/venom-ice-axe
One important point about these tools is that they too, like alpine ice axes, encompass a broad range of features and intended uses. These axes may be the most versatile tools on the market. The danger, of course, is falling into the “jack-of-all-trades-master-of-none” category. It probably takes an experienced climber to understand exactly how such tools can be used. Beginners are probably better served with traditional tools for mountaineering, and technical tools for steep ice and mixed.
What can alpine ice axes teach us about technical tools?
I think there are some important parallels between the design of alpine ice axes and modern technical tools. For example, I talked about the differences between the Air Tech, which supports several different hand positions, and other tools, which lock the hand in limited positions. This is a question of ergonomics, or the relationship between physical objects and our bodies.
Nearly all technical tools are designed to be ergonomic in some way. Indeed, the name of the popular and excellent Petzl Nomic is derived from the very word:
http://www.petzl.com/en/outdoor/ice-climbing-tools/nomic
Here is a similar tool:
http://www.blackdiamondequipment.com/en-us/shop/climb/technical-ice-tools/fusion-ice-tool/
And another recent offering:
http://www.grivel.com/products/ice/ice_axes/75-avatar_comp
Each of these tools provides a specific place, or a number of specific places, where your hand is designed to fit. The popularity of these tools attests to their success. However, are ergonomic tools necessarily a good thing?
Allow me to make a comparison to the design of road racing bicycles, a world which I know more about than I ever will about climbing. For nearly a century, the standard design of the road racing handlebar followed rounded curves from the tops of the handlebar through the lower sections.
http://ritcheylogic.com/dyn_prodfamily.php?k=355357
The proportions of the curves varied but the contours were always smooth. Then, in the nineties, the ergonomic handlebar was introduced, offering, it was said, more comfort, greater power, different reach, and so on.
http://ritcheylogic.com/dyn_prodfamily.php?k=299398
I find that ergonomic handlebars tend to lock my hand in a single position, or a limited number of positions, instead of allowing the infinite number of positions afforded by a traditional bend. It will probably come as no surprise that I prefer handlebars with a classic curve.
To return to ice axes, perhaps the new generation of ergonomic tools lock our hands in a single position, or a limited number of positions, instead of allowing the variety of positions which more traditional designs might offer?
Don’t get me wrong: I love my Nomics for steep ice, however, part of the reason that I prefer Nomics over other similar tools is that Nomics offer many hand positions over the length of the shaft and grip, and all of the contours are relatively smooth, making changes easy. Several times on this blog, Dane has mentioned the rounded curve of the pommel of the Nomic, and how this design allows for a good deal of rotation in the hand: this is the kind of feature which I think makes Nomics such good tools. I question the serrated spike in the new Nomics, not because of the failure issues, but because of the degree to which the spike might limit the rotation of the pommel.
Following this train of thought, I wonder if modern tools would benefit from simpler shaft designs with fewer ergonomic grips? Would ice tools with deep curves and high clearance but relatively smooth shafts work? Would such tools allow you to move your hands easily and access a wide variety of hand positions? I don’t have the answers, but I think the questions are intriguing.
Another parallel between alpine ice axes and technical tools can be found in the design of the old vs. the new Petzl Quark. Here is a link to Dane’s discussion of these tools:
http://coldthistle.blogspot.com//04/new-petzl-quark.html
I recognize the benefits of the new system: the modular adze and hammer, the ability to strip down to the tool to save weight, the improved swing, and so on. However, I have reservations about the new head design.
The Quark is a great tool for steep ice. But the Quark is also a decent all-around tool. Quarks plunge well, the head offers a wide variety of hand positions, the adze and hammer swing nicely, and with a little finesse you can even use the them for self arrest. With my Quarks, I often switch between a variety of hand positions, the same way that I do with my Air Tech. I am not sure that the new design—with the adze or hammer installed, or with these components removed—will offer the same support and comfort as the old design. As I mentioned above, I like holding my ice axe by the adze with part of my hand aligned along the head. This is very comfortable on the old Quarks but less so on the new Quarks, because a good deal of metal has been removed and the angles are all sharper. Of course, it will come down to how you intend to use the tool, but I will probably stay with my old Quarks.
New perspectives
Is there anything we can learn from this discussion about climbing itself? Perhaps the only lesson is that alpine ice axes, especially designs which incorporate some features of technical tools, like dropped picks, are quite versatile, and surprisingly capable on steep ground, including ice and mixed.
Often, I see beginners setting out to tackle relatively straightforward objectives with two technical tools strapped on their packs. Maybe this is unnecessary. Maybe a single alpine ice axe would be enough for many if not most alpine climbs. There is a certain grace, as well as a pleasing challenge, in taking only one tool on a climb. Do more with less. Or, to quote Steve House, “The simpler you make things, the richer the experience.”
So, my final advice is the following: take your old alpine ice axe out of the closet and study it closely. How can you use that axe? Would it work for that ridge traverse you are thinking about? That couloir you have been eyeing? That summit you have in
mind? Perhaps your alpine ice axe can take you to greater heights than you imagined. "Three tools...all of them being used on one climb. Only one made the climb actually possible, a classic style axe. needed just to get over the 'shrund!" 


 We prowled through several of the gift shops where you can find lots of Southwestern gifts. This Christmas tree was covered in chili pod lights. there were pots, fetishes, blankets, baskets and religious crosses and other items. I bought a small carved owl for me and one for a friend. Plus a Christmas bell decoration with a hand painting of the Mesilla church on it.


 The NW corner of the park usually has its own share of flood related damage each year. And though it's not unusual for there to be Carbon River inspired washouts, this rainstorm brought substantially more destruction to the area. For example, here is the idyllic Ipsut Creek Cabin. It suffered heavily during the flood. Is it me, or does this place remind you of Yoda's house on Dagoba?
 This creek diversion gives literal meaning to the name, Ipsut Creek Cabin. If Yoda did live here, he'd have to use quite a bit of "the force" to fix things.
 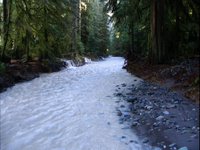 As for the Carbon River Road, more than two miles of it washed away in at least four separate spots. In some places, the river flowed down the middle of the road (like here). For climbers, this could spell delay in early season attempts of Liberty Ridge.
 Photo of Sarah and her dog Lobo. Lobo is the brother of a dog I used to have.
 I posted photos of the Rio Grande River at Albuquerque, NM a few weeks ago. These are photos of how it looks where it runs near Las Cruces. The dought has hit harder there that it has here. There were only small, murky puddles of water here and there. But it gave a good view of the river bed which I had never seen. This cottonwood in fall colors looked great against the beauty of the stark, gray rock hills. Sarah's dogs Lobo and Ruby loved to chase a stick and bring it back together. The also liked to play in the yucky mudpuddles. There is a photo of me and Lobo. And a photo of the river sand with a few of the tiny, delicate fresh water clams that should live here. All I found were a few shells. I hope that there will be enough of them to survive if the water ever comes back. A lot of the water is used for irrigation by the farmers and a lot is left in Elephant Butte Lake which is north of Las Cruces. I would think it would make more since to take more water out of the lake and send it down river, although I have heard the lake is at it's lowest since it was built. It is a man-made lake. I didn't get any photos of the lake this trip.


 Today is my sister's birthday. Teresa Jane Wiseman Ratcliff Plybon would have been 55 years old today. Born in 1954, she passed away not quite two years ago. The picture, above, of Terry and Grandma was taken in early summer, 1955.
 Birthdays seem to run in pairs in my immediate family. One of my nephews was born on my Mom's birthday in May (he was her first grandchild). One of my nieces and I were born in February, a few days (and, obviously, years) apart. My older brother and one of his sons, as well an uncle (by marriage) were born within three days of each other in March. His twin boys were born on the last day of March.
 Astronaut Snoopy greets you at the entrance to the outdoor display area. Another one of those gray, gloomy days. It was actually a nice day though a little on the chilly side. The sky cleared a bit later in the day, but the clouds never went away.
 The videos play as the driver takes you to another stop on the tour.
 The business end of the Saturn V rocket.
 The Space Capsule sitting atop the Saturn V rocket. You just can't appreciate the size of that assembly until you walk beneath it. It's huge!
 As an extra bonus, which was (we were assured by the bus driver) a rare site for the average visitor, as we were heading back from the second stop, we saw them preparing to move the Space Shuttle to the launching pad for its next mission in early February.